Using Cloud Function to Fix GA Session In One Go
Using Google Cloud Function to add ga_session_id into your GA4 BigQuery daily table
I’ve received some feedback indicating that the last solution posted here may not be a good fit, especially if the campaign_id is used. While it’s true, today I’m introducing a more robust solution to solve the ga_session_id challenge in one go, period.
In brief, the solution involves manipulating the table to unnest the ga_sesison_id into the event level. It’s as simple as that.
Creating the Google Analytics and Google Cloud Data Pipeline
Configuring Google Cloud Function to run the SQL
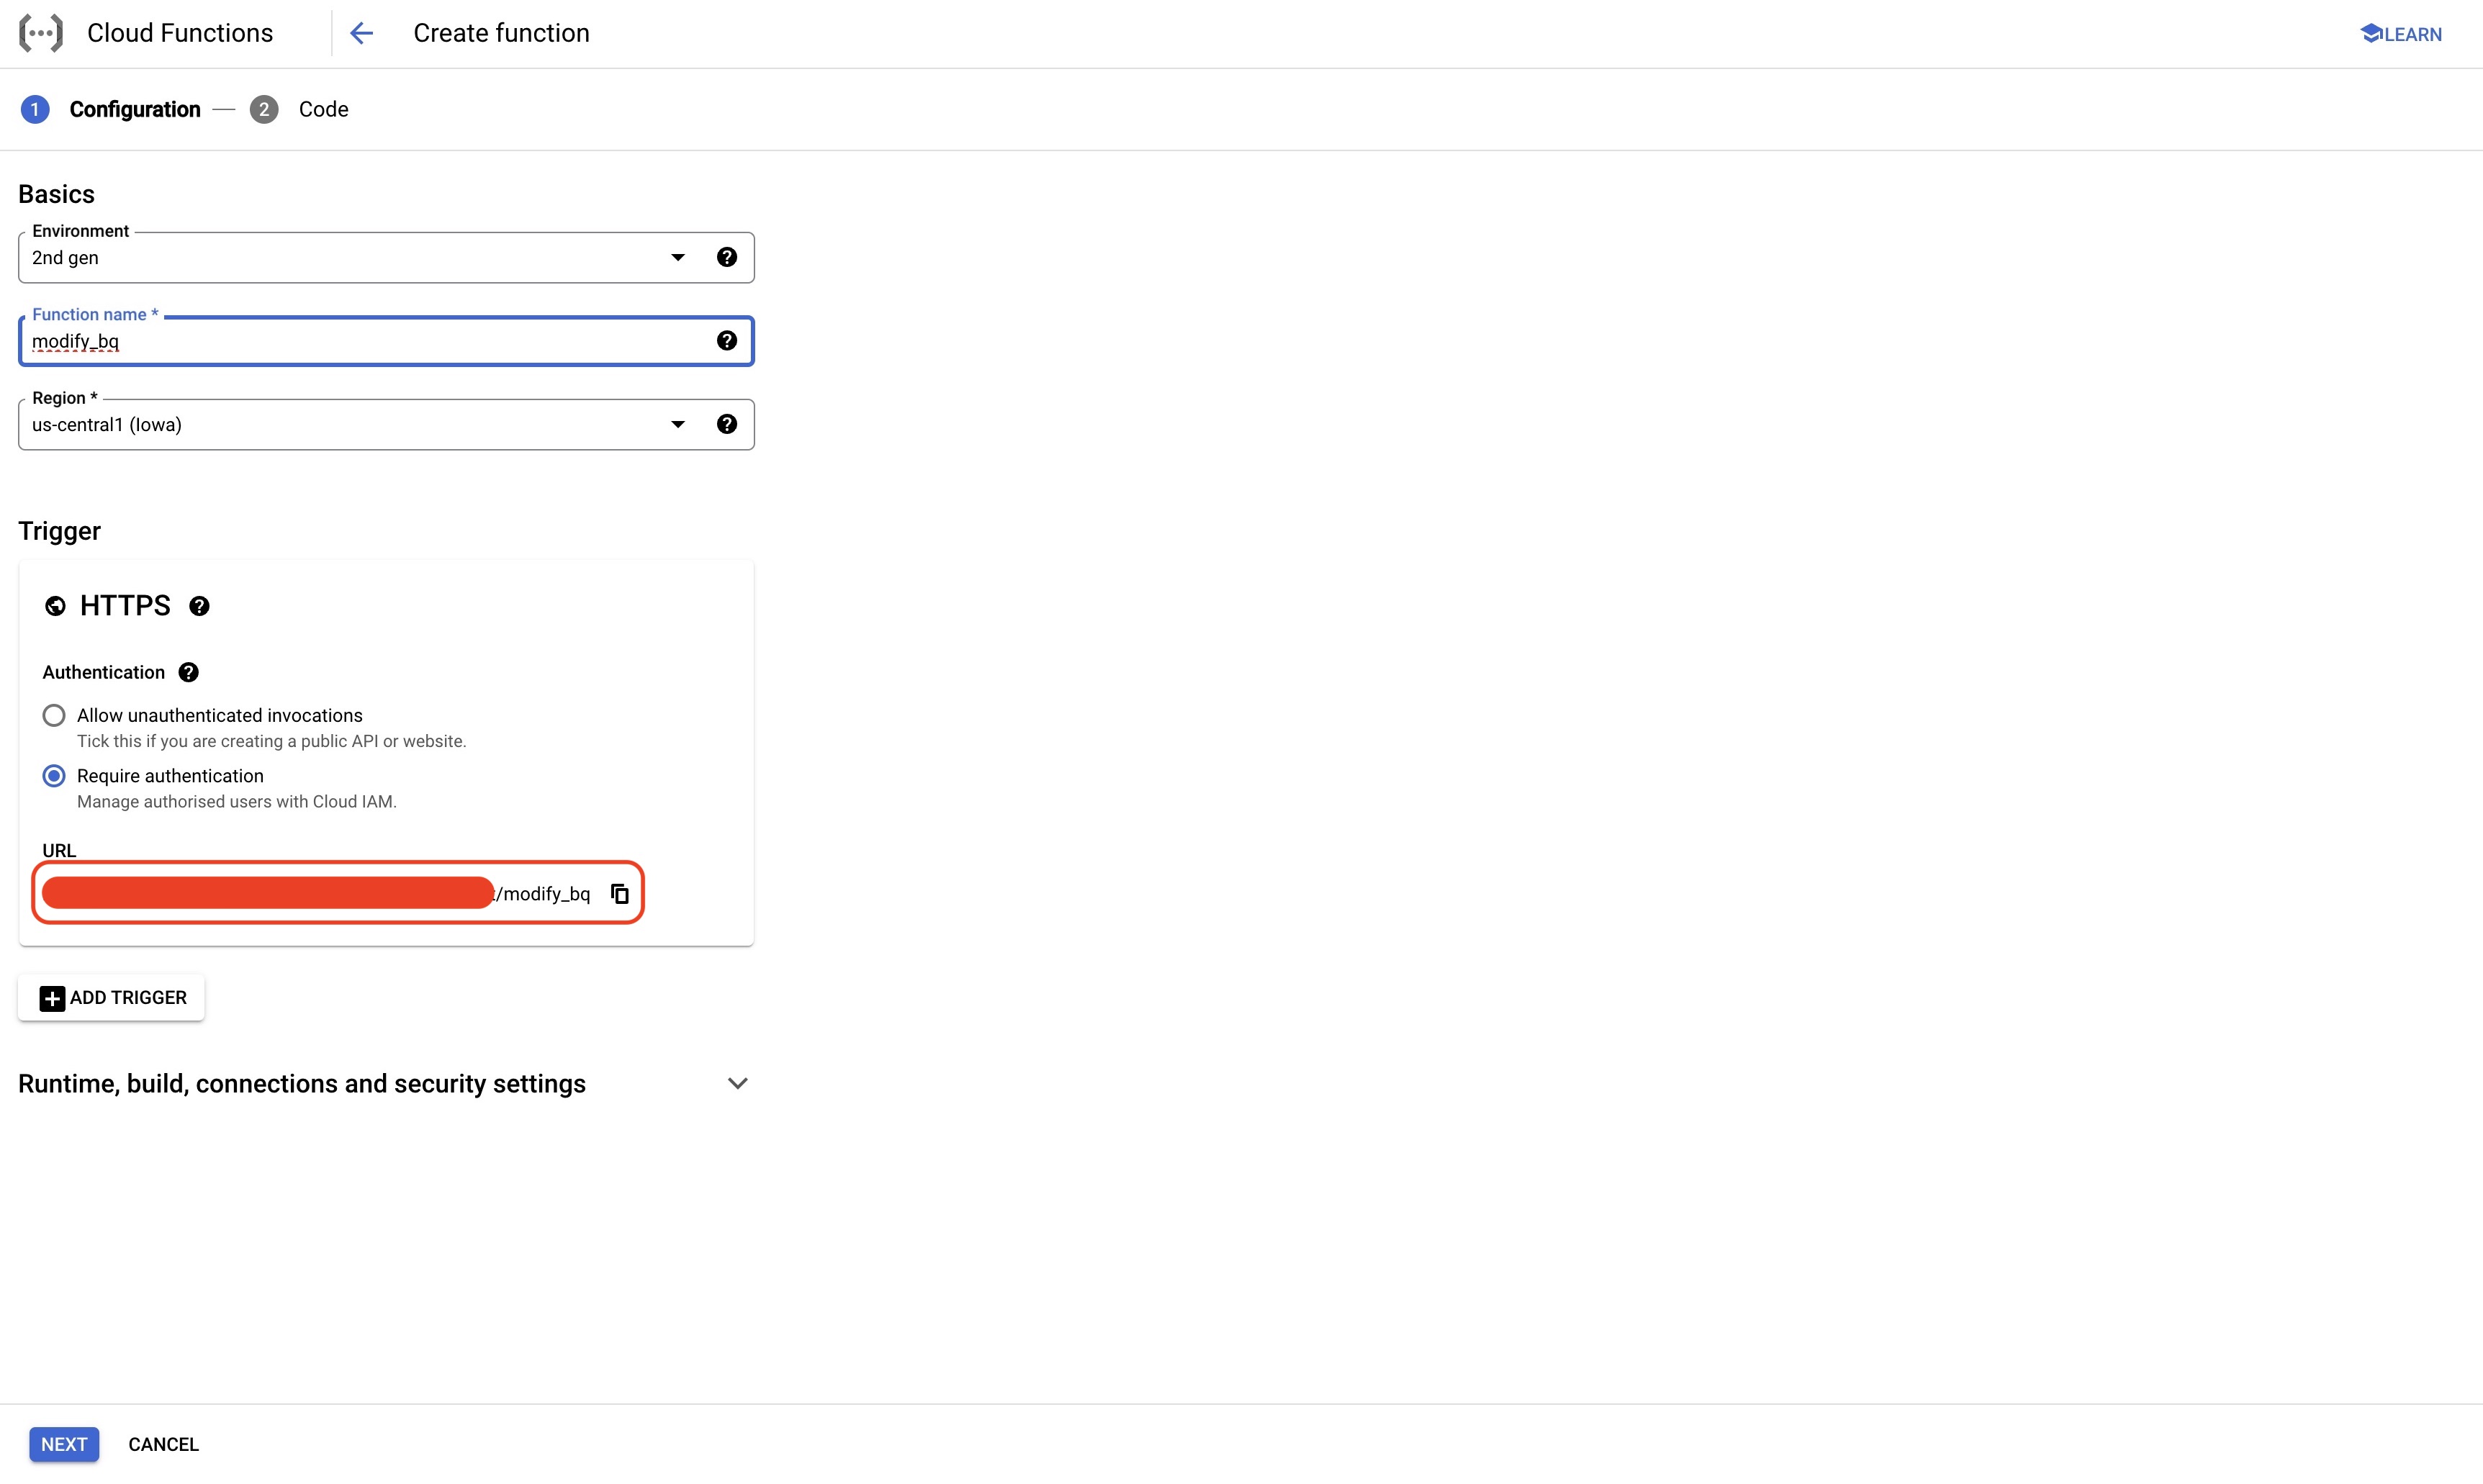
Step 1: Navigate to GCP Cloud Function
Go to Google Cloud Platform and navigate to Cloud Function, then click “Create Function”.
Step 2: Create Cloud Function
my setup: environment: 2nd gen trigger: HTTPS, required authentication
For the rest, you can just keep it as it is. it’s recommended to require authentication for your function, otherwise other people who have access to URL can trigger your function as well.
Remember! Copy the URL as you will be using it in the next section when setting up scheduler
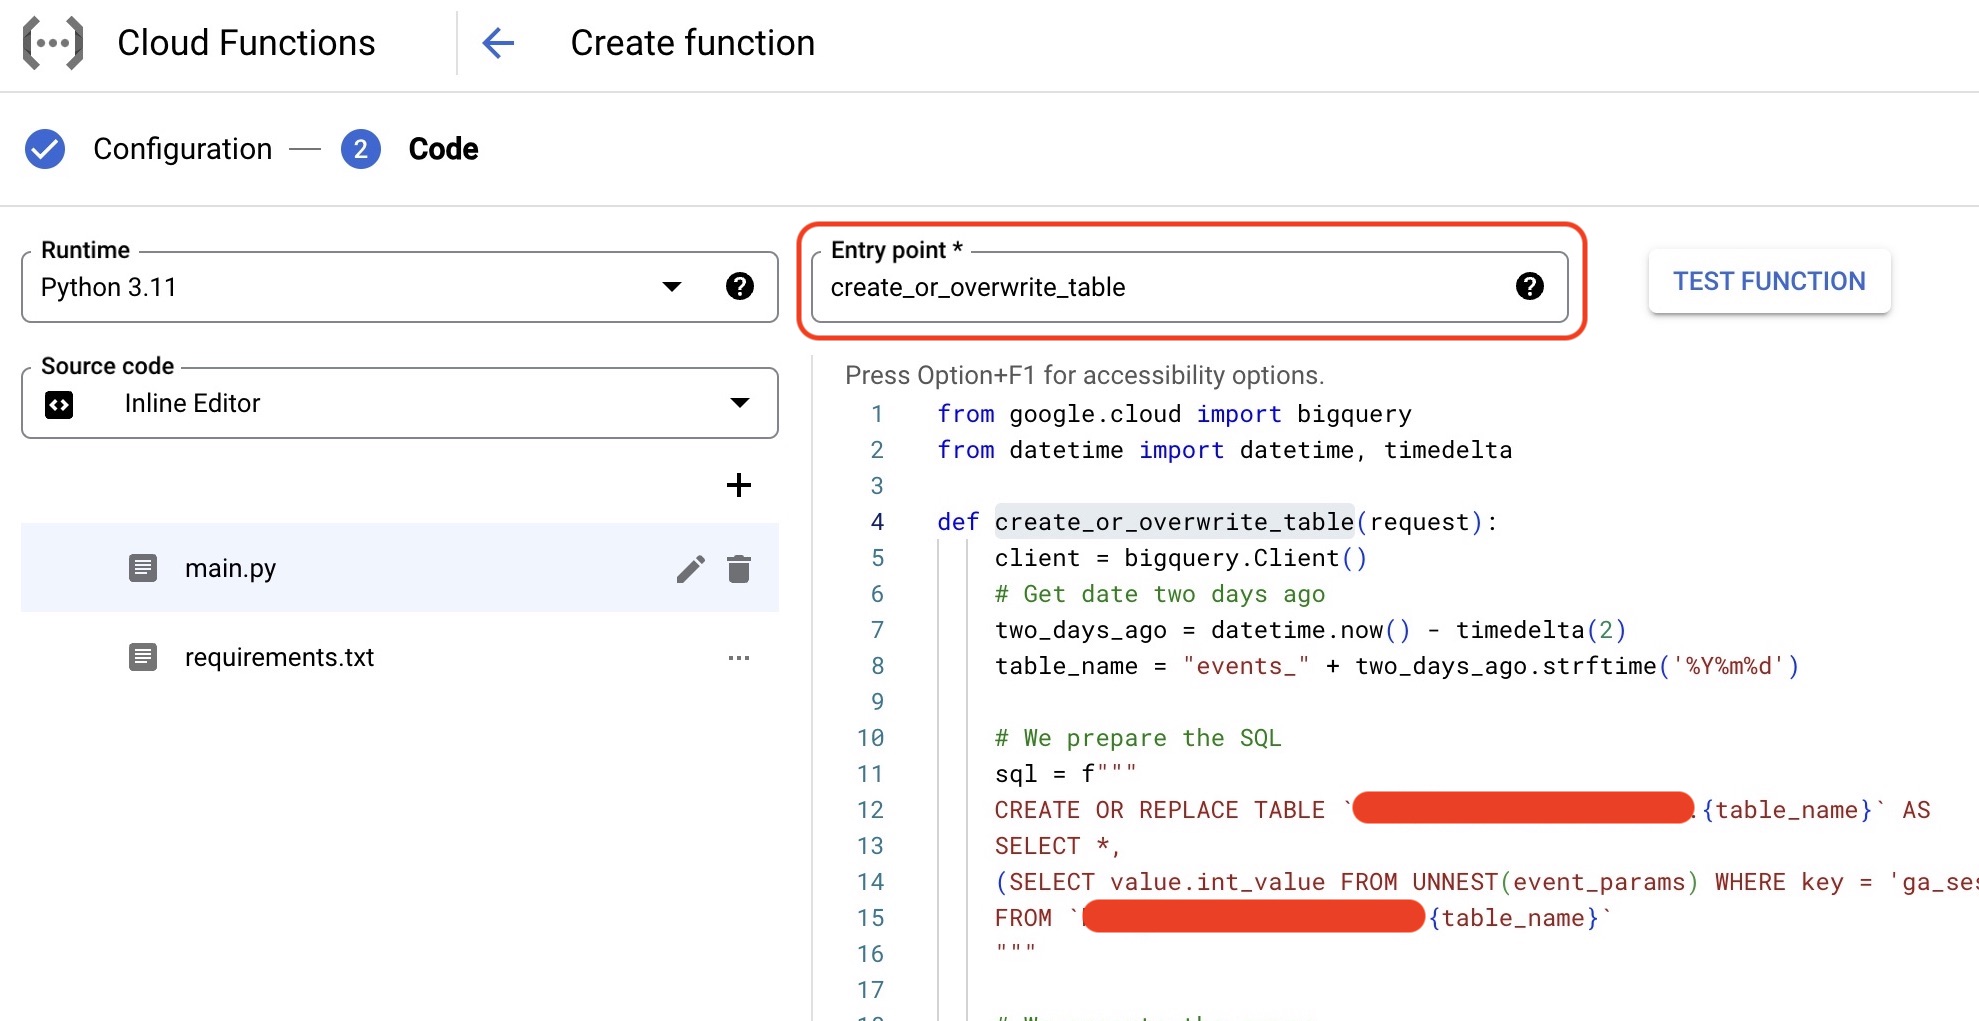
Step 3: Write your function
write your own function to do the modification. Or, copy and paste the function below, remember to change the table to your own table.
def create_or_overwrite_table(request):
    client = bigquery.Client()
    # Get date two days ago
    two_days_ago = datetime.now() - timedelta(2)
    table_name = "events_" + two_days_ago.strftime('%Y%m%d')

    # We prepare the SQL
    sql = f"""
    CREATE OR REPLACE TABLE `YOUR_PROJECT_ID.YOUR_DATASET_ID.{table_name}` AS
    SELECT *,
    CAST((SELECT value.int_value FROM UNNEST(event_params) WHERE key = 'ga_session_id') AS STRING) AS ga_session_id
    FROM `YOUR_PROJECT_ID.YOUR_DATASET_ID.{table_name}`
    """

    # We execute the query
    job = client.query(sql)  # API request
    job.result()  # Waits for the query to finish

    return 'Table created or replaced successfully'
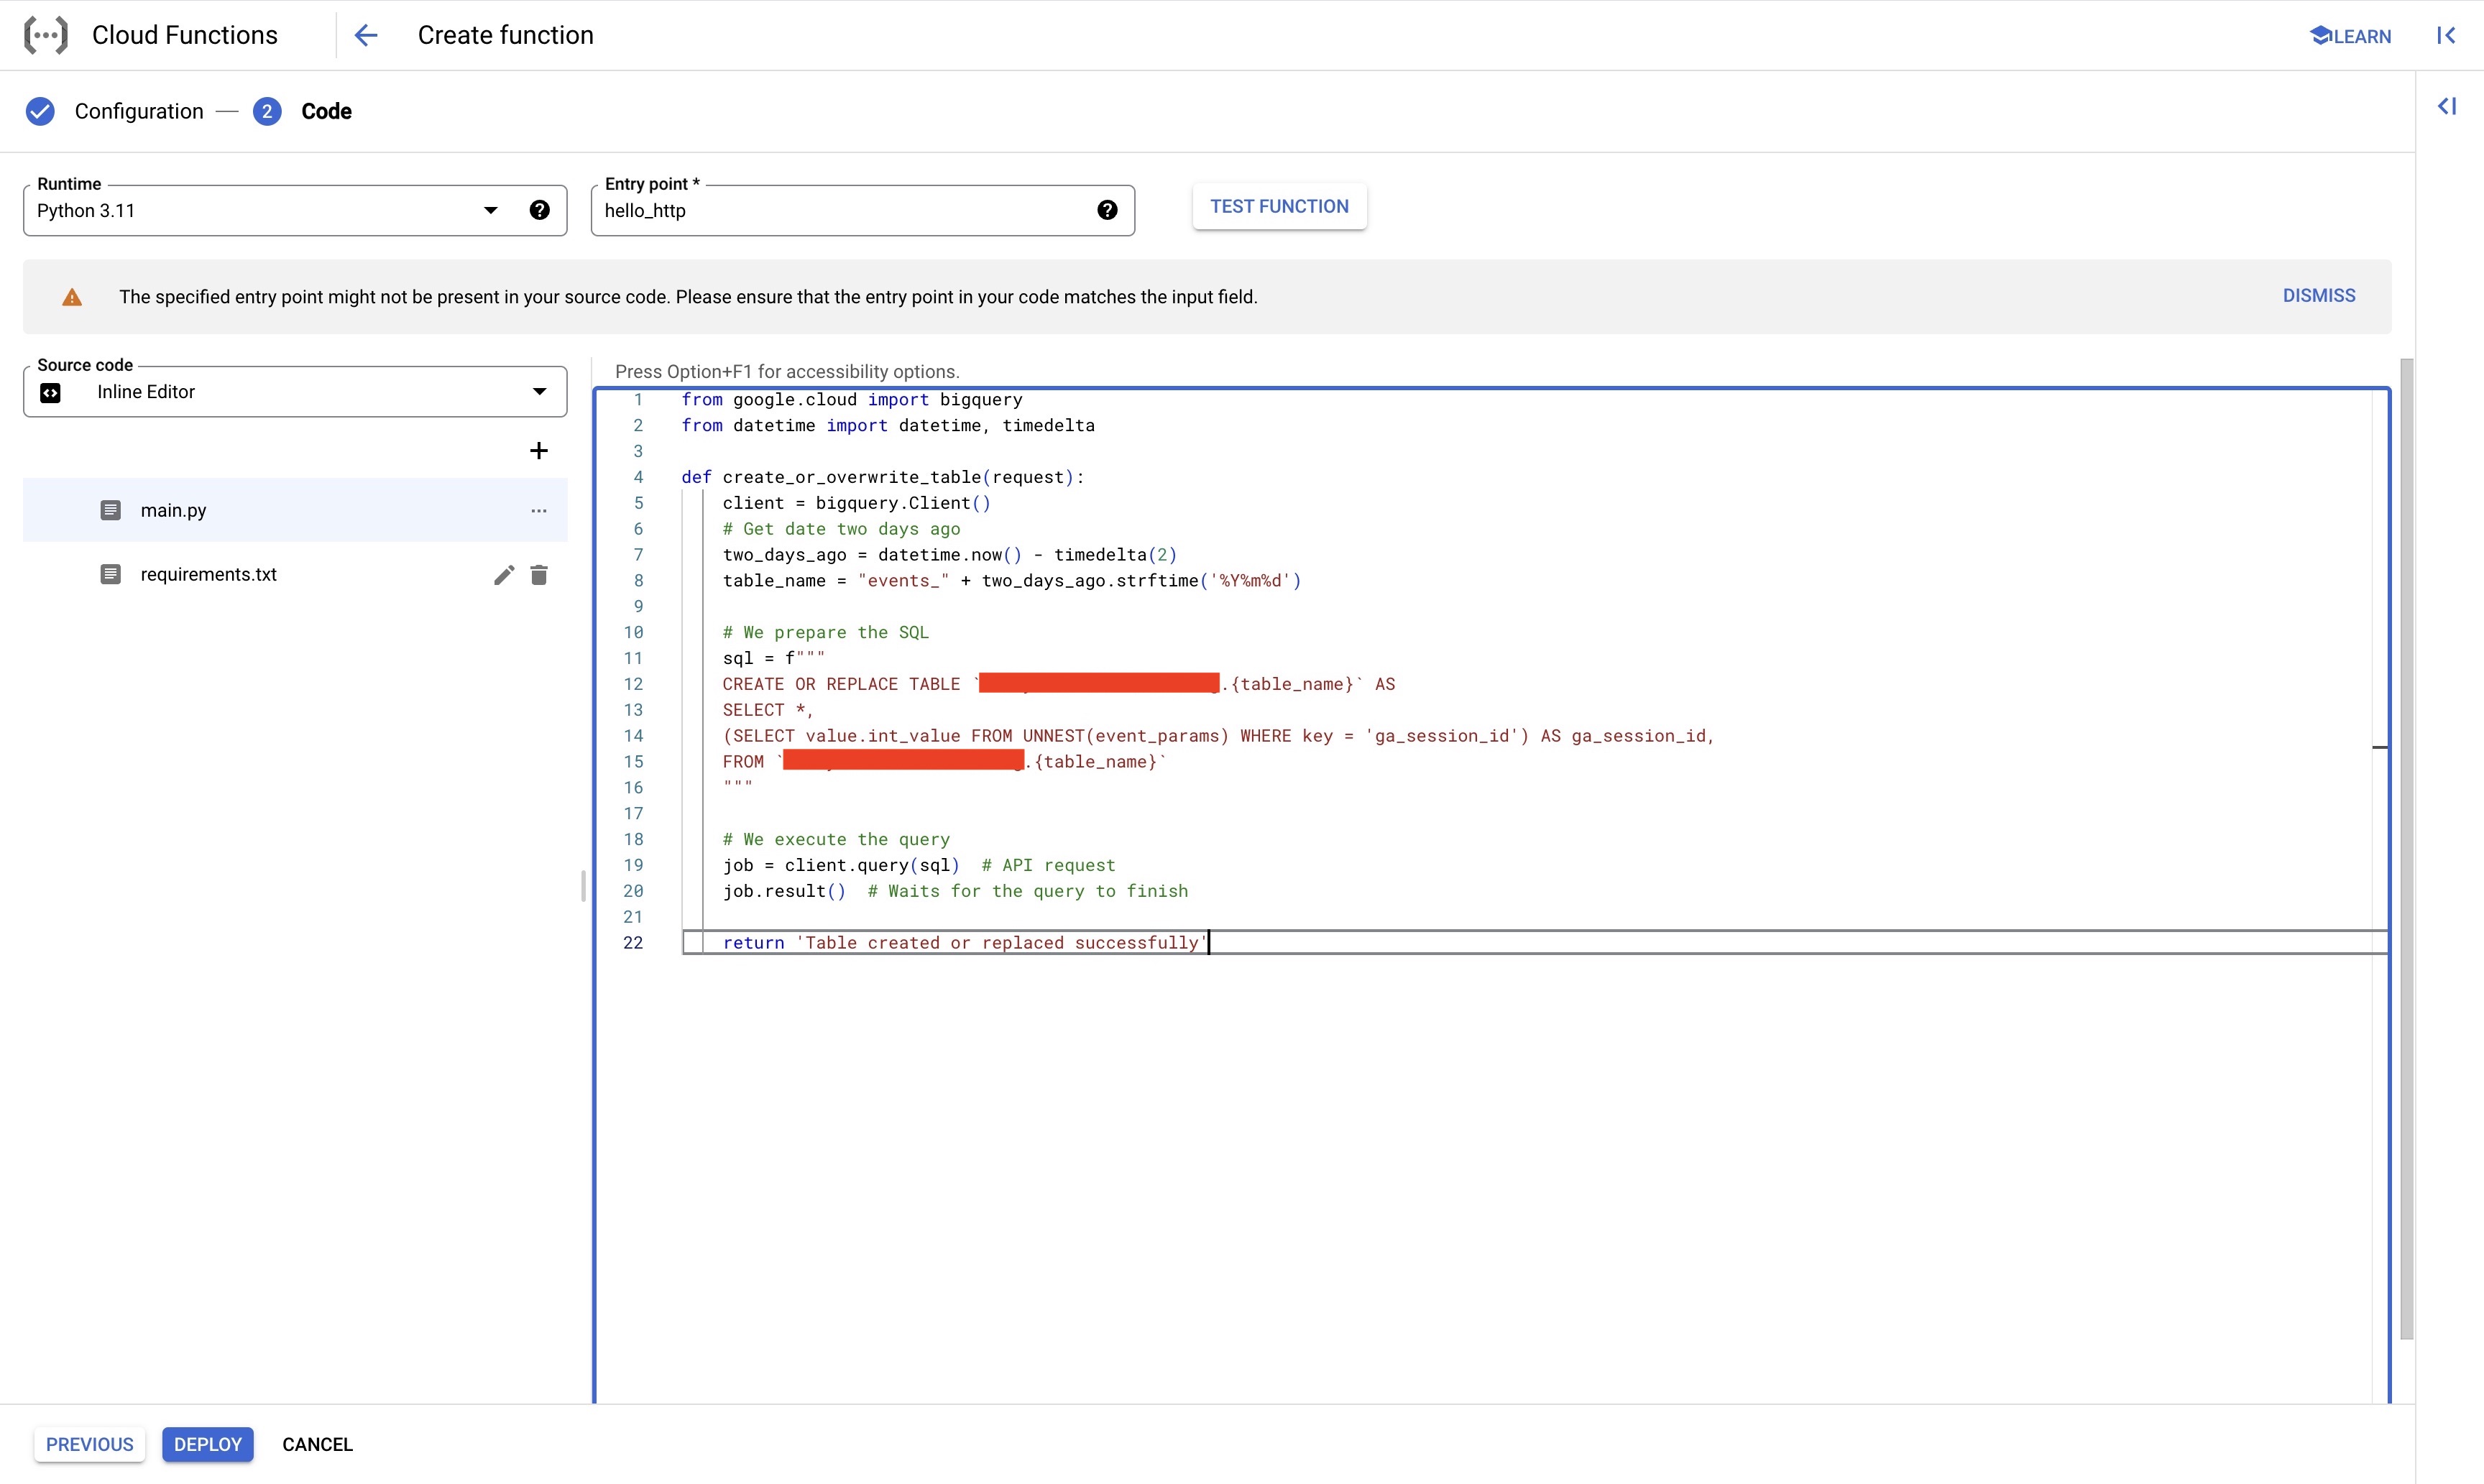
remember! update your Entry point to your function name
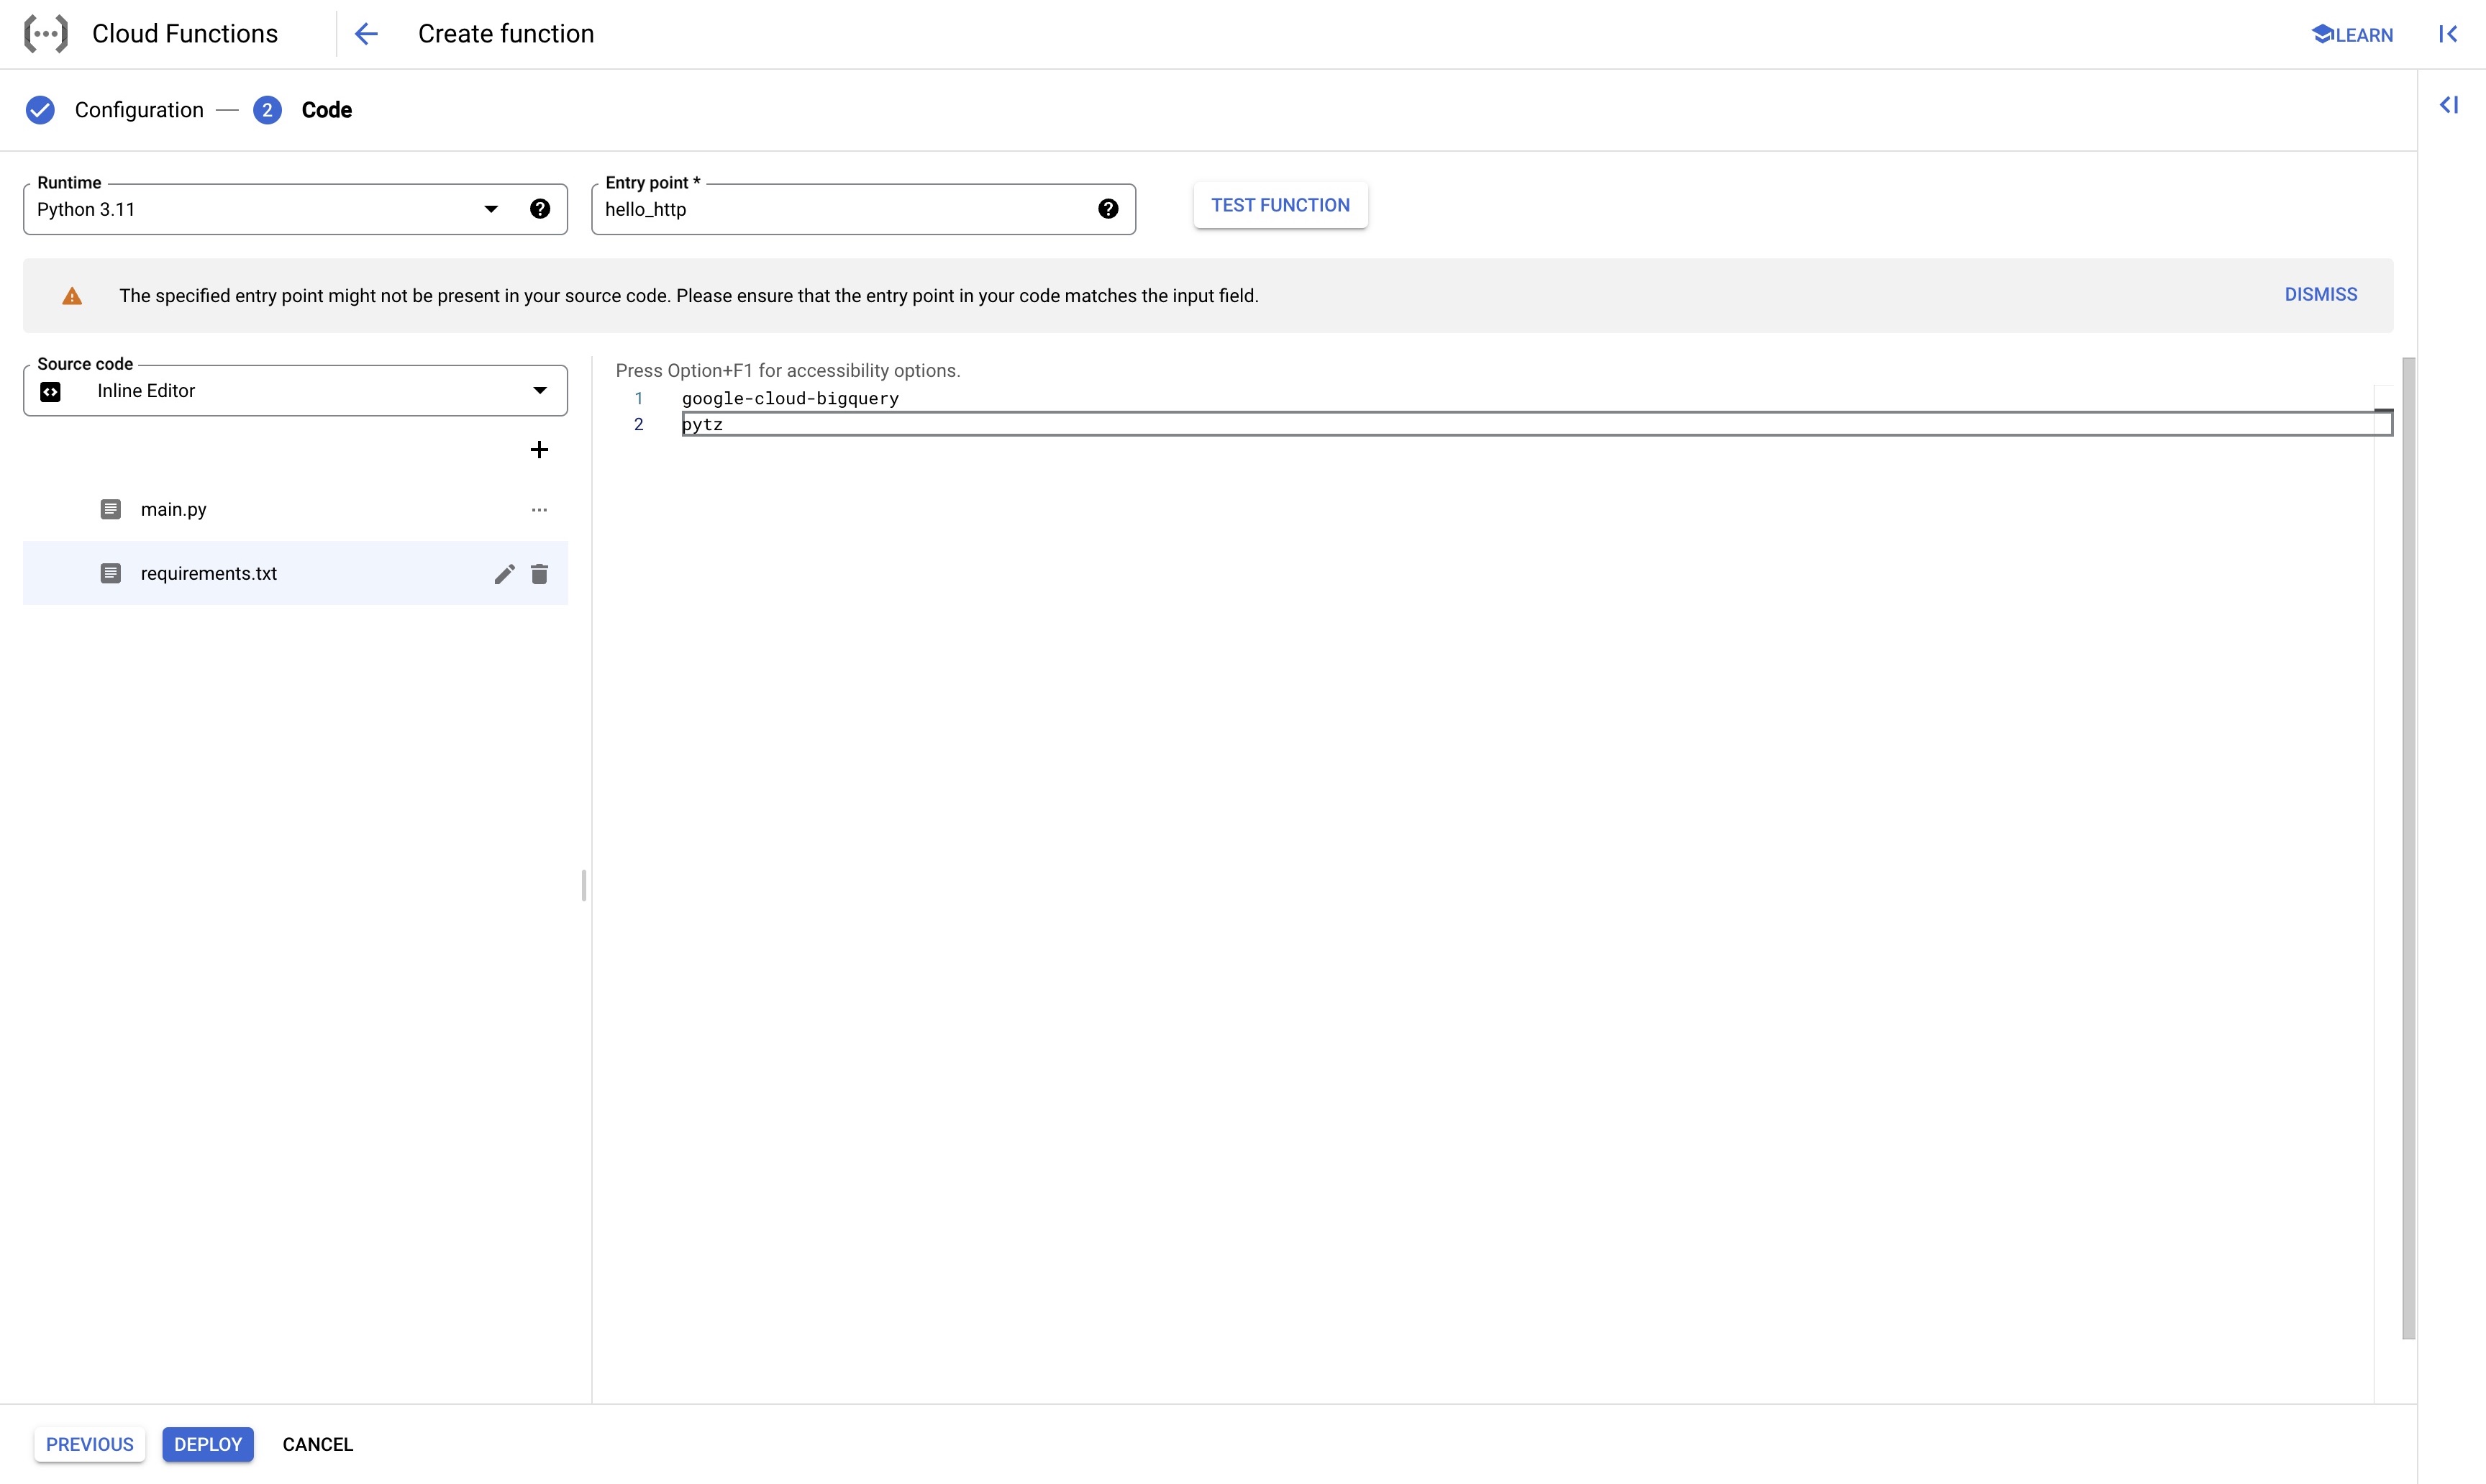
Step4: Update requirements.txt
update the requriements.txt to make sure your python code can run
google-cloud-bigquery
pytz
Step5: Deployment
hit deploy and go!
Again, remember to copy the cloud function URL

Configuring Cloud Scheduler to schedule Cloud Function job
Step1: Navigate to Cloud Scheduler
click schedule a job
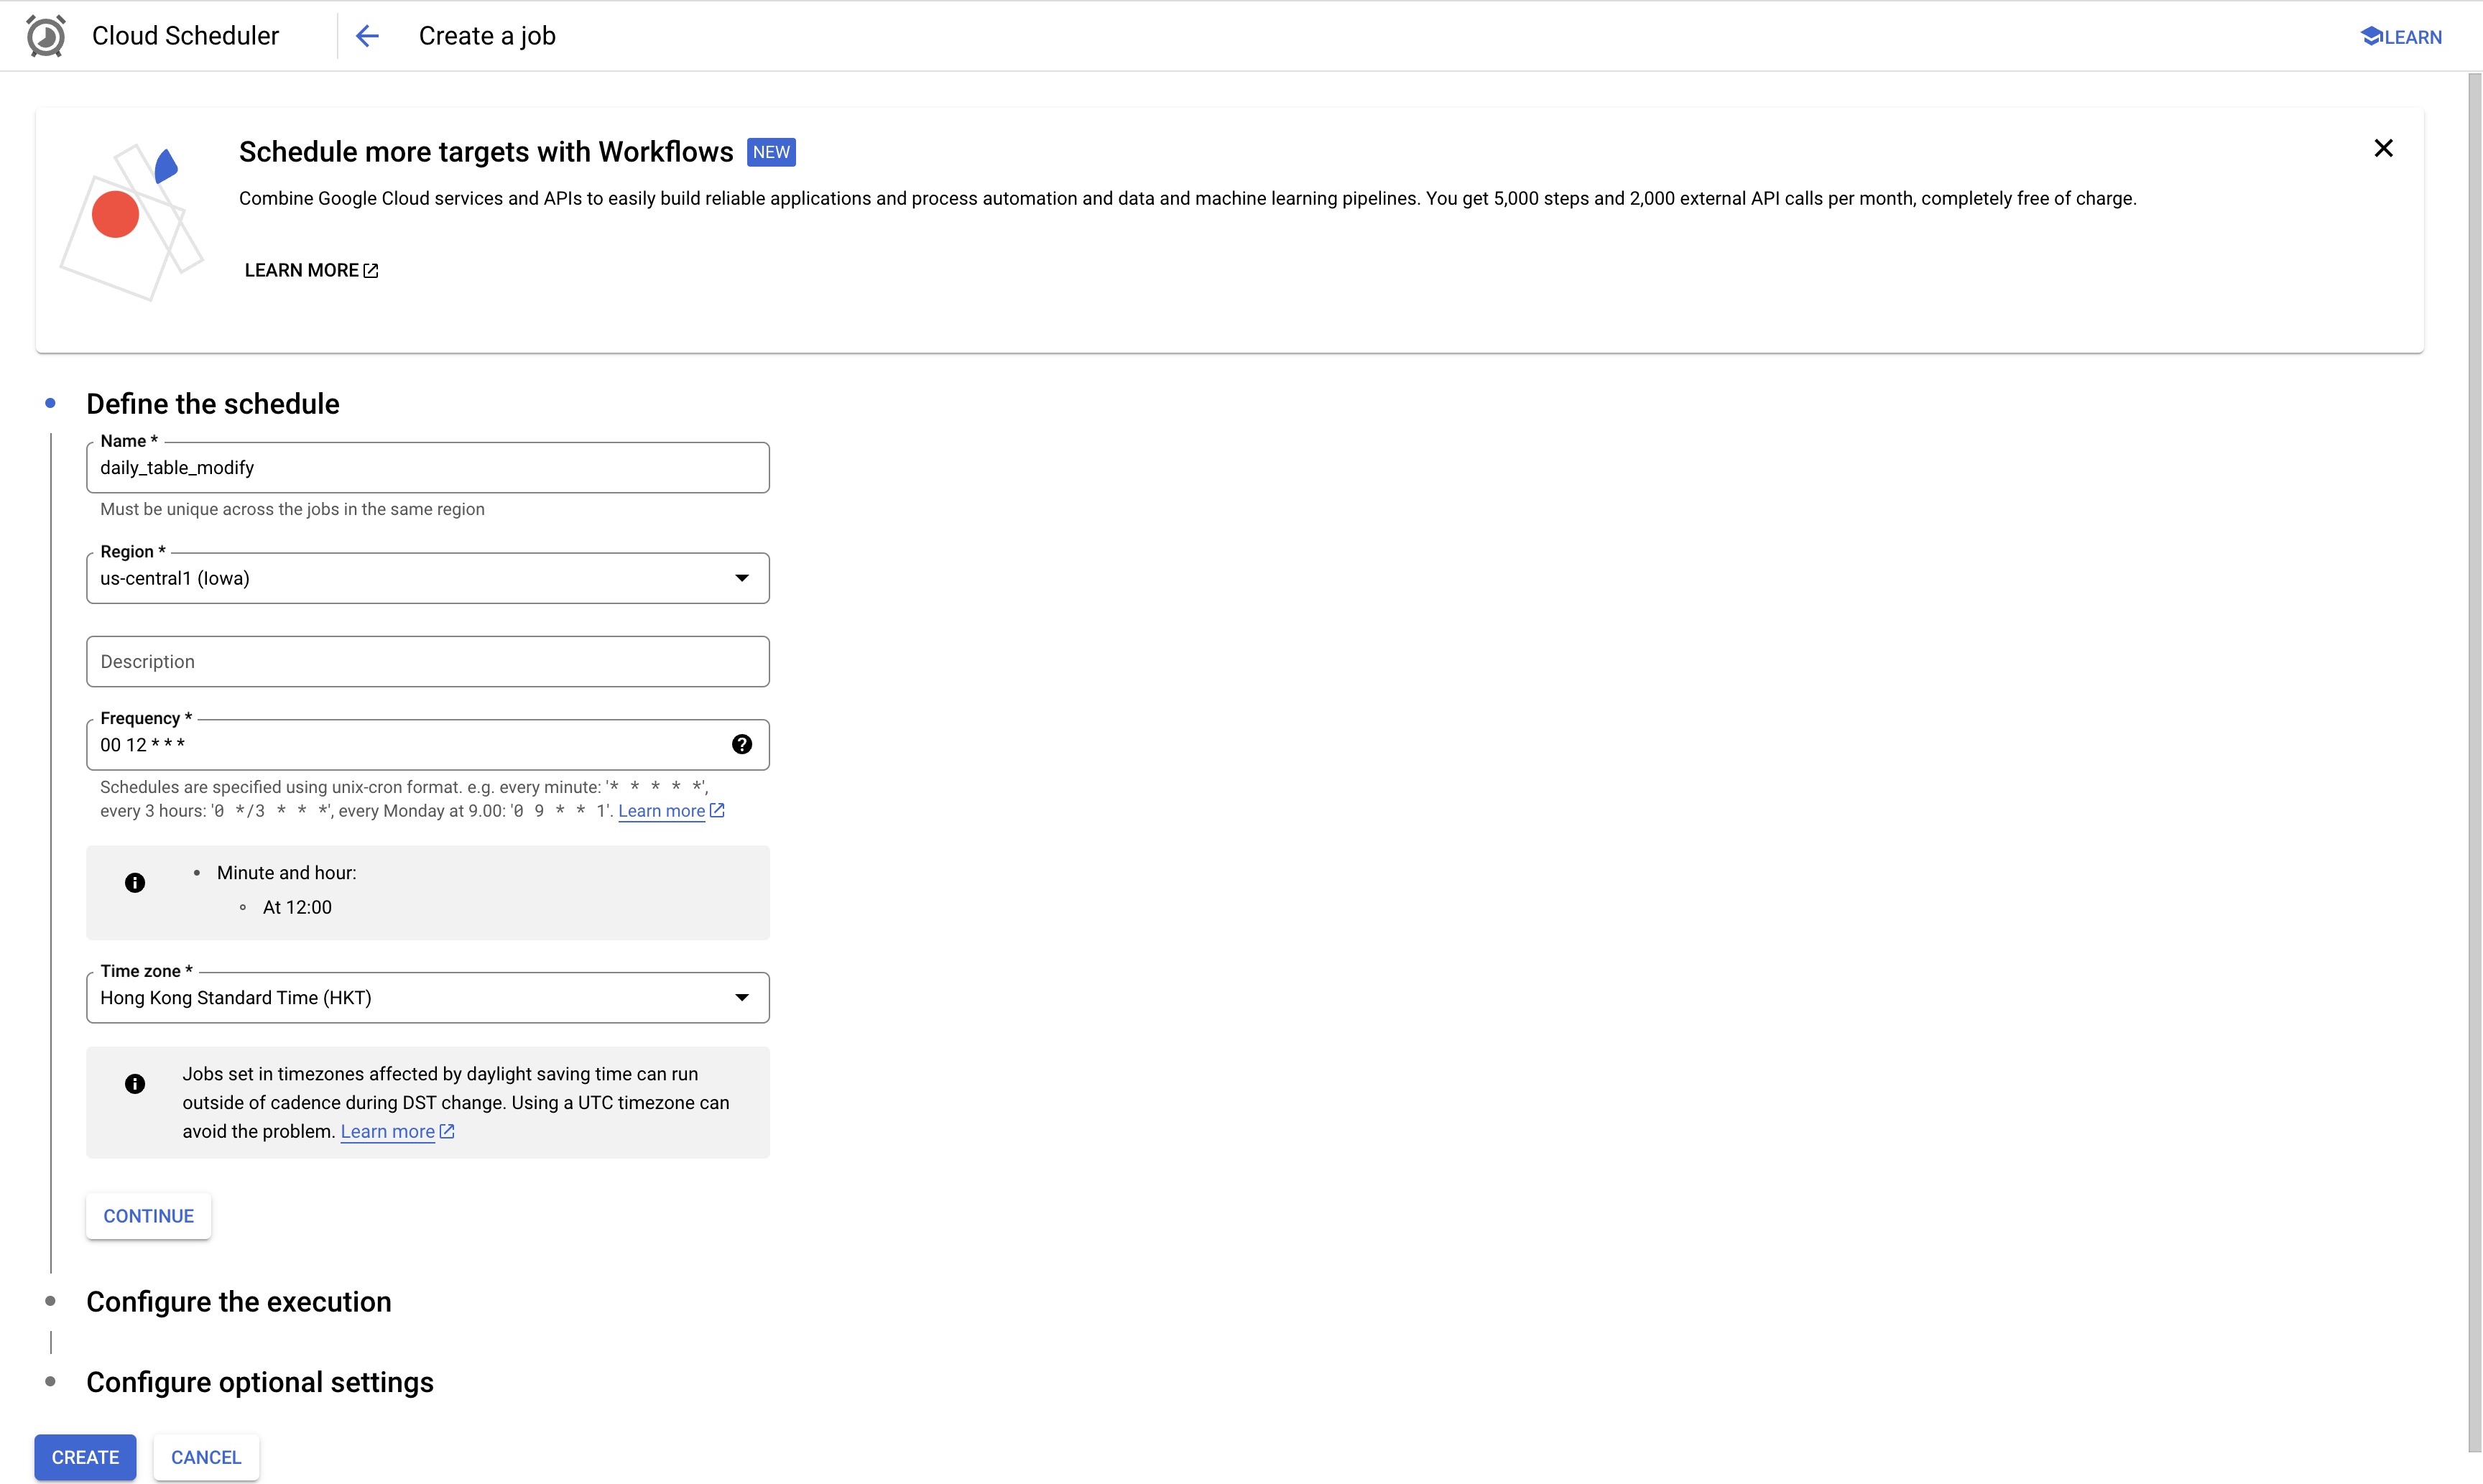
Step2: Define the schedule
For region, you can keep it as it is, for timezone, it is recommend to follow your GA4 property time zone.
Here’s the tricky part, for the frequency, it is actualyl using CRON schedule If you are not familar with CRON scheudle, that’s fine too! You can go to the website Cronitor it has a very intuitive way to help you set it up!
For my setup, I put it as 00 12 * * *, this mean it will be running everyday at 12pm
You might wonder about the best time to set. Navigate to your GA4 BQ table, go to your table, then look at ‘Last Modified’. Add three hours as a buffer. To be safe, you could even run a query looking at the past 90 days to get a safer buffer to run the job.
The goal is to ensure your daily table is created and completely stable before we do the modification.

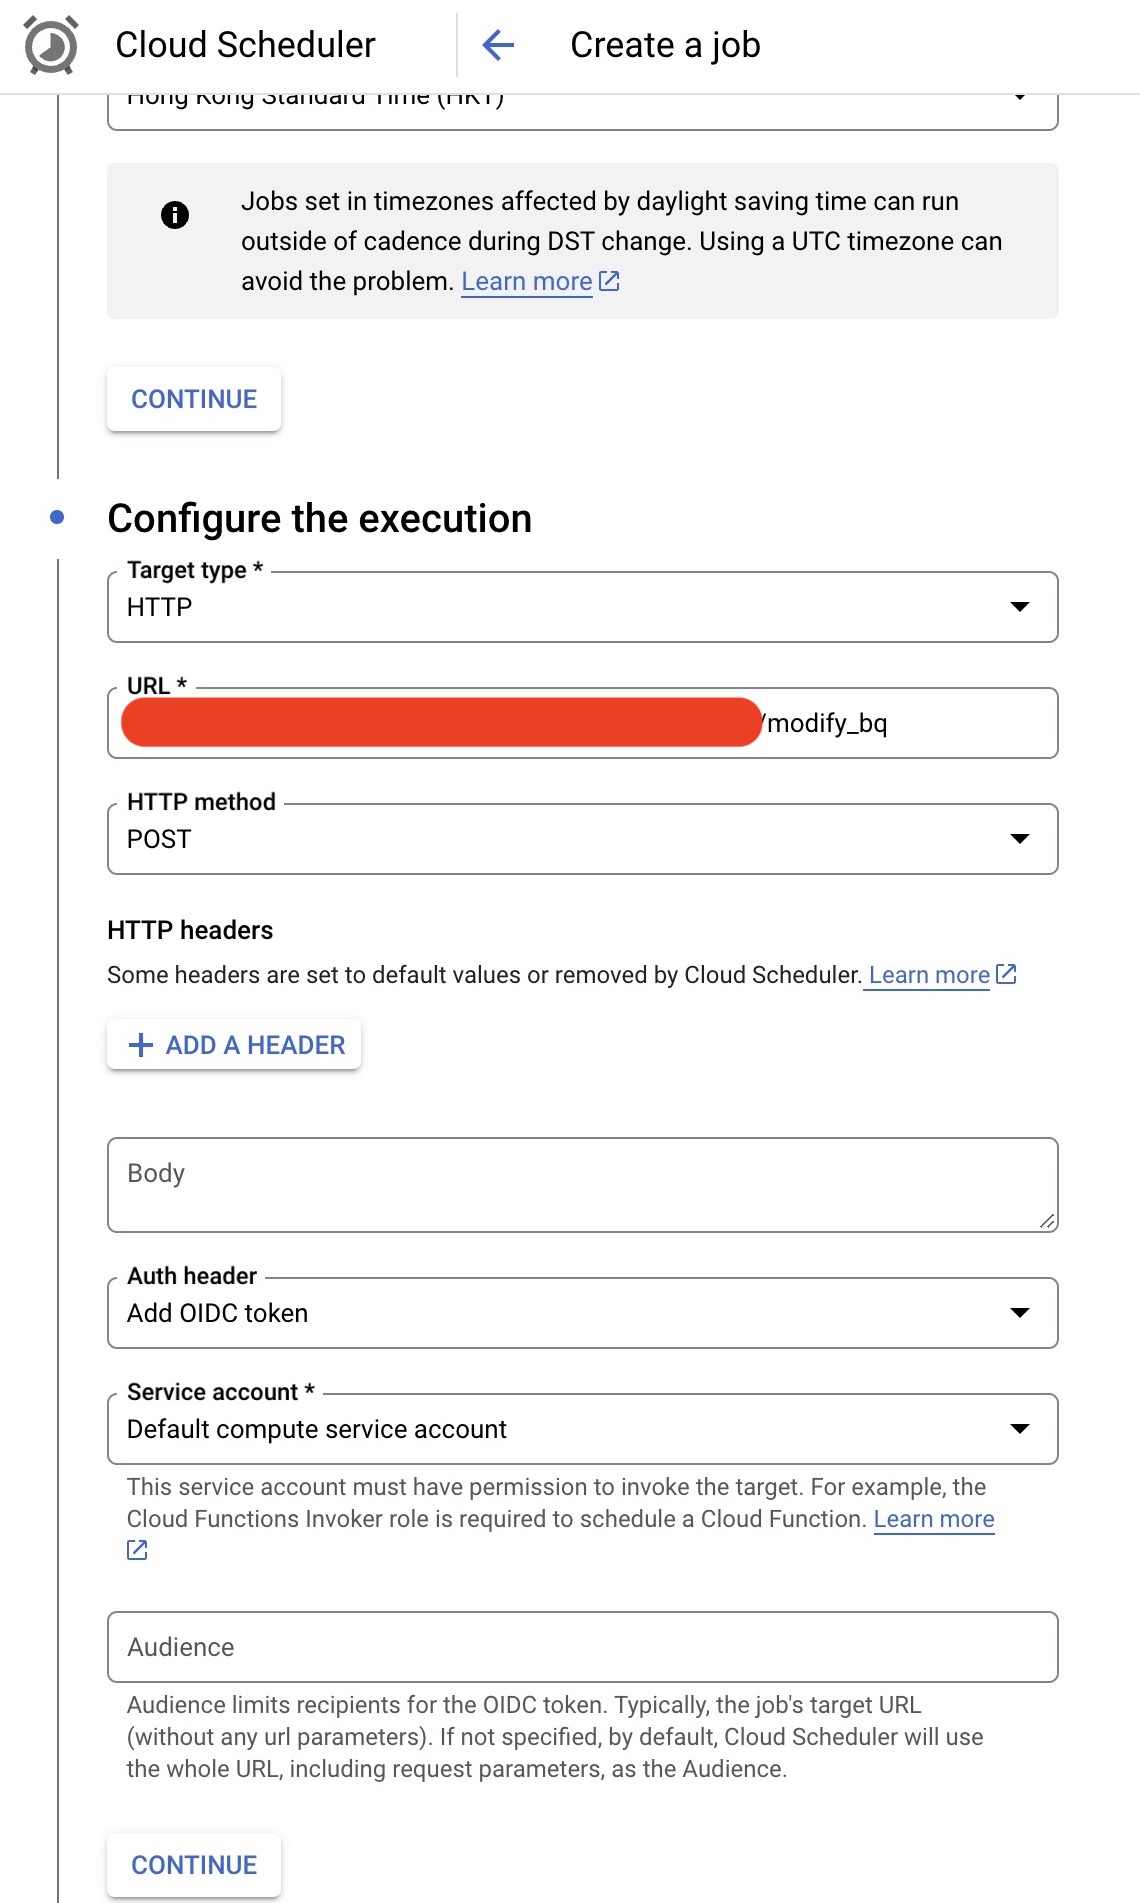
Step3: Authorise your Cloud Scheduler execution
To complete the Cloud Scheduler setup, you can setup the rest as below:
- Target Type: HTTP
- URL: put in the URL you got from previous step
- HTTP Method: POST
- Auth Header: Add OIDC token
- Service Account: this is where things get tricky, you can create your own service account, but you need to make sure the account has enough right to execute the cloud function, for my setup I use “Default compute service account” which is similar to owner access level.
Step4: Save and run!
After saving the scheduler, you can see the scheduled job in your Cloud Scheduler home page, click the icon on the right to “Force run”, this will run the scheude job immediately and have your dataset updated immediately!

Result & Demonstration
Examining data set
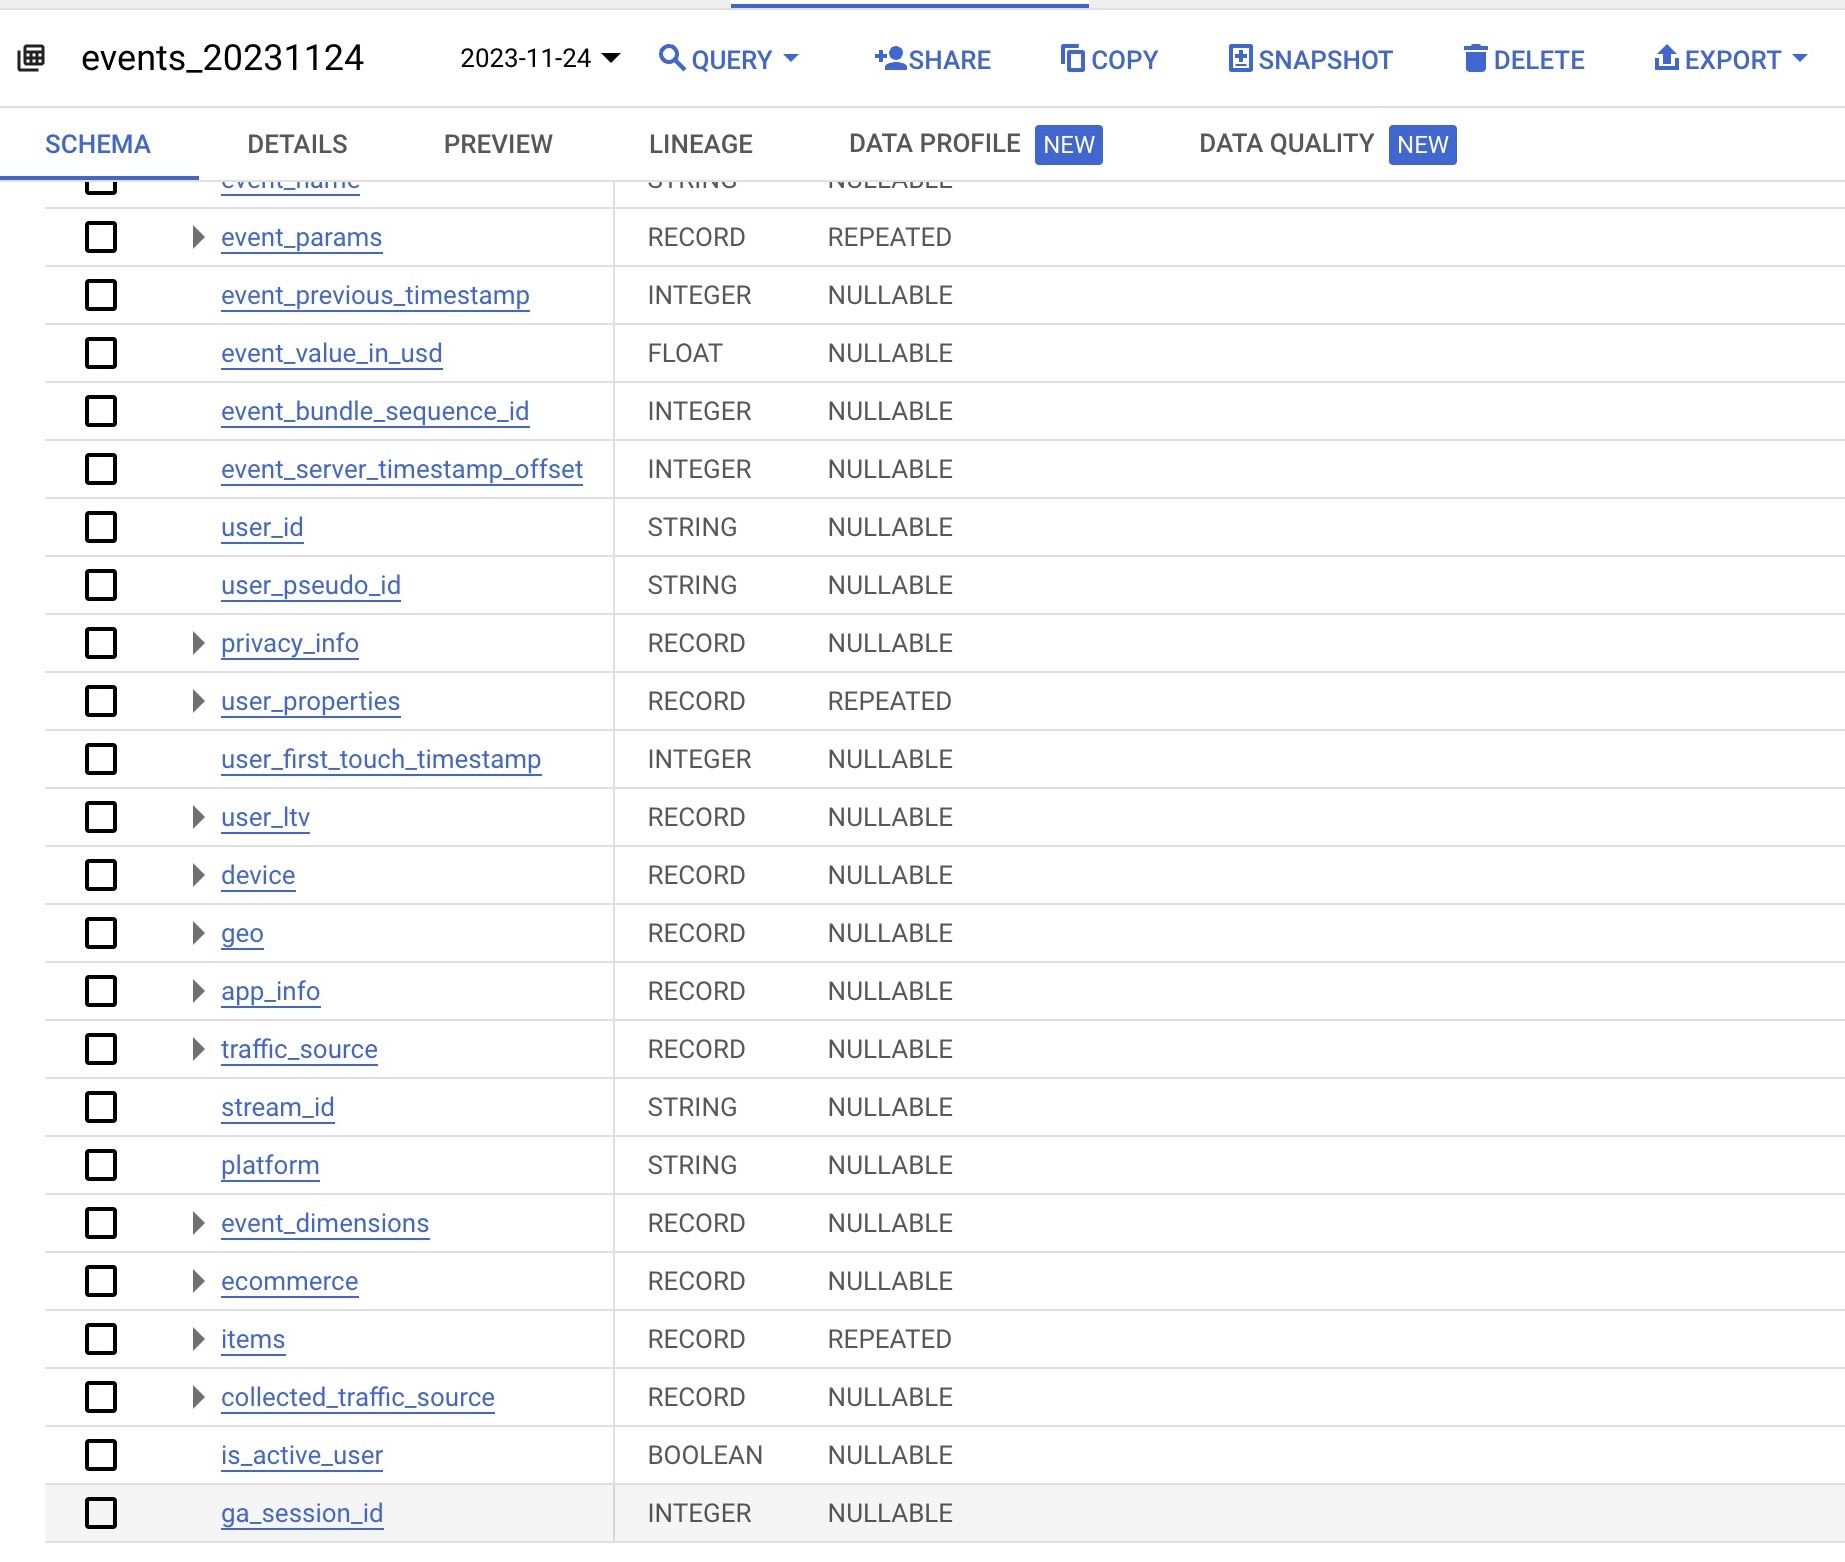
If you followed through the setup, congratulations! You managed to get the ga_session_id!
navigate to your original dataset, when looking at your schema, you should be able to see the new column, “ga_session_id”
Reproducing session calculation
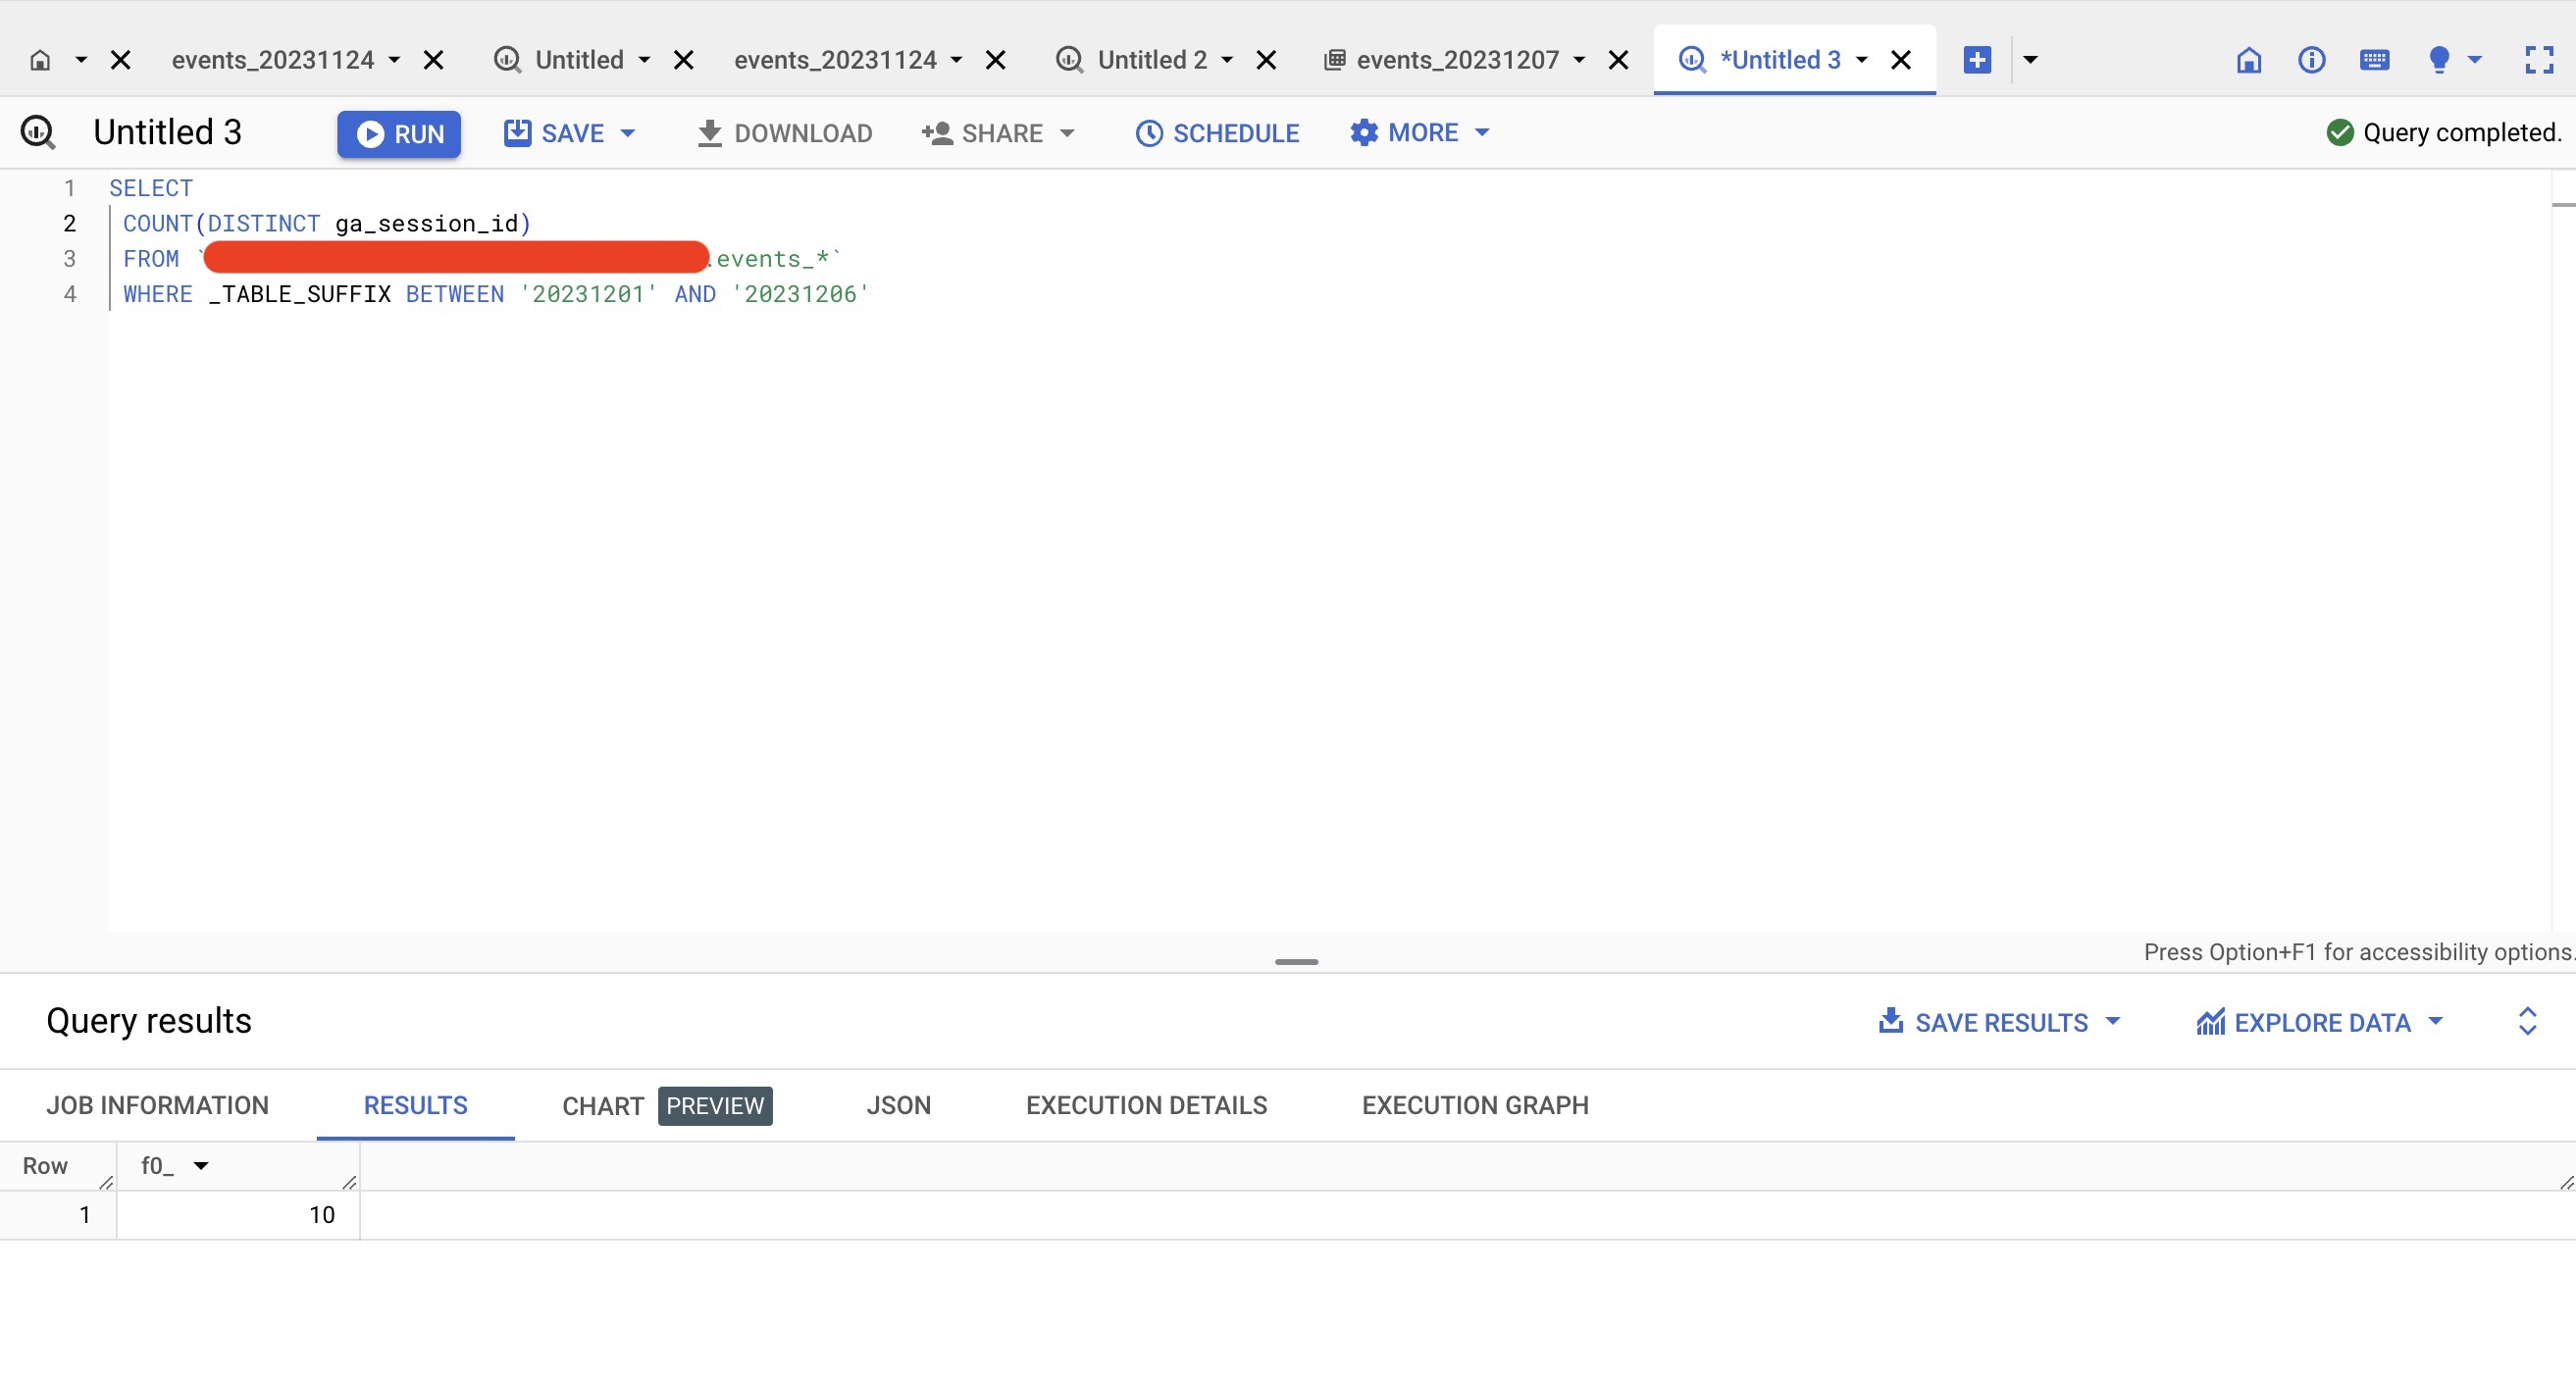
Now try comparing the session counting, Go to a GA4 sesison report.
You can see we got 10 session in the past 6 days.
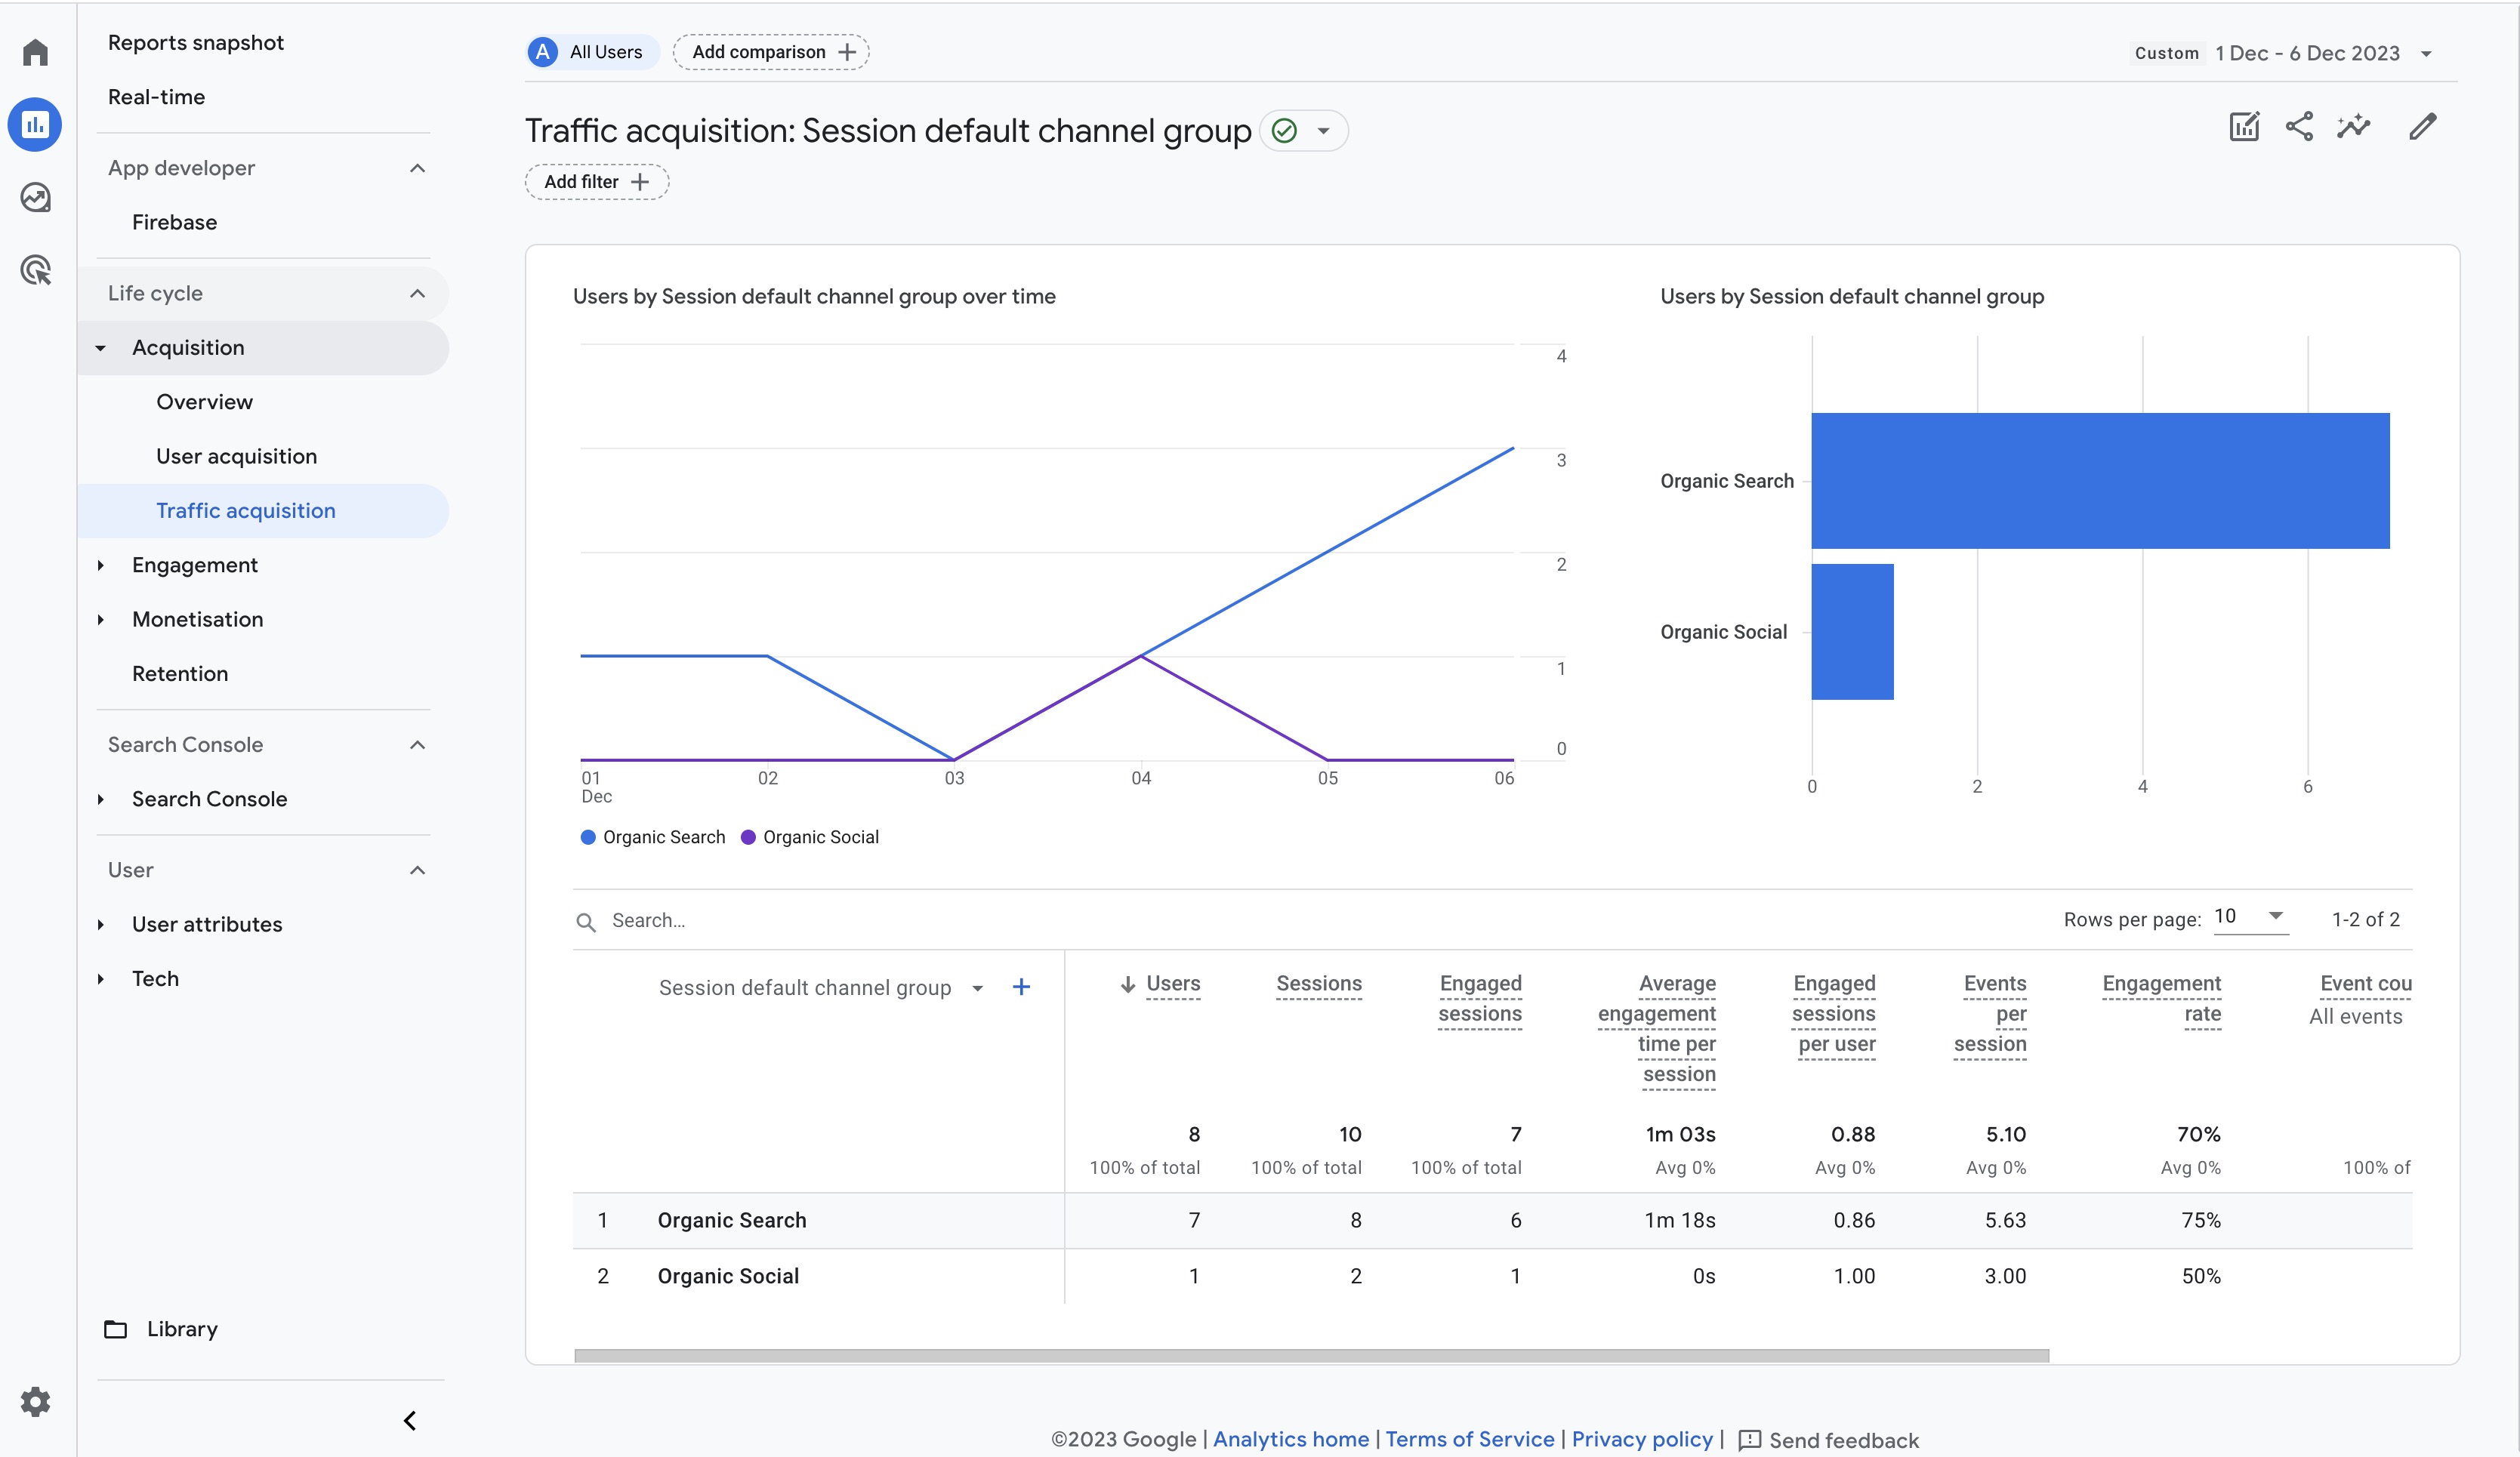
Now run the query to count distinct ga_session_id, we got the same result!
Methodology & Rationale
Let’s discuss why we’re using this method and its pros and cons.
Any Alternatives?
Our cloud architecture is as below: Cloud Scheduler to trigger job –> Running Cloud Function –> Update Table in BigQuery and overwrite existing Table.
There are a few alternatives:
Set up a Pub/Sub Topic –> Set up BigQuery Audit Logs to publish to Pub/Sub –> Trigger the Cloud Function –> Update Table in BigQuery.
This method can listen to changes in BigQuery, and when the daily table is uploaded, it can send a message to trigger the cloud function. The advantage is that we can guarantee the existence of the daily table, but the setup and listening costs are higher.
Cloud Scheduler –> BigQuery Scheduled Job.
This method is easy to set up and requires no coding. However, overwriting an existing table is not allowed, meaning you’ll have to create a separate dataset, which doubles the storage cost.
Why Cloud Function + Cloud Scheduler?
While Pub/Sub seems more reliable, the cost to set up and listen is higher. As we know that the GA4 daily table is pretty stable, setting a simple Cloud Scheduler makes the solution more manageable, simpler, and cheaper.
Caveat?
Let’s say we missed one day due to:
- Google missing the daily table upload timeline
- Google system failure missing the entire daily table
- Other reasons causing the pipeline to fail (e.g., credit card hitting limit)
Identifying a problem on a specific day would be hard. However, you can go to your log explorer to see if it ran successfully, or you can simply check to make sure ga_session_id exists on every daily table using SQL.
After identifying which date has failed, hit ‘Force run’ to run the job manually, and we should be good to go! You might need to run your cloud function manually, but a simple SQL and overwriting should do the work. But that’s another topic for cloud platform usage.
I hope this setup is useful for you!